Today, I am going to show you my final choice for a mother board.


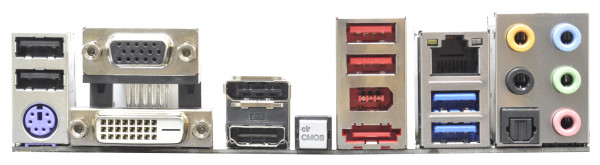

As you can see, the I/O back panel is slightly different than the last one.
It has the addition of 4 onboard display out puts. It loses the mouse connector and the SPDIF coax. It retains the SPDIF optical. It loses two USB 2.0 ports. It retains two USB 3.0 ports. With it's Z68 chipset, also known as onboard graphics, it combines the ability to use discreet video/graphics cards with technology on the board. Another way of putting it, it works well in the gaming world and also in the video realm as well. With a screamer of a Central Processing Unit, it will be fast.
Part of the reason I chose this one is not having to have a graphics card. They range from $200 to $4000 a piece. The ones I have picked out are $250 a piece. Oh, and I am going to have two of them. That is a subject for another column.
My experience with graphics cards is that they burn up easily. Hopefully it is because I didn't have enough air pushing through my computer case. We'll see.

This is the mother board. Under the V8 sign is the Z68 chipset. It is the part that controls onboard video and graphics out puts.
Now, I could spend all your time explaining every single header that shows up on the left side, but it won't mean anything to you until you install one. Suffice it to say that headers are the way that you get that USB port working on your front panel. It also has IEEE 1395, an on/off switch, reset switch, hard drive working and a couple of other things that an installer would need to put this thing together. You as a user generally don't need to know where or why these things are here. It is nice to know how some of it works. As an installer, it is necessary to understand what each header does. For installers and repair people, there is Dr Debug. On the left of the picture, you see a two digit led light. It gives up what is wrong with your motherboard.
On the bottom, there are the various SATA ports, The black are the SATA 2 ports and the grey are the faster SATA 3 ports. Next is the 24 pin main plug in from the power supply. If you happen to see three pins sticking out by their lonesome, they are for the fans, either the front, top or rear fans. There is even a fan for the CPU.
The four parallel sockets close together on the bottom are for memory. On the right, near the top is an 8 pin power for the CPU. In the center, near the top is a 4 pin legacy power needed for SLI technology. It seems that a boost of energy is needed when putting more than one graphics card on board.
Next up: Computer Cases. Why is it so important to keep things as cool as possible. A well designed case shows why. Or, Graphics Cards. Why two are better than one.
No comments:
Post a Comment